


DIY Did I Do This To Myself?
The five-day mission to redo my bathroom while my husband was out of town

It is a truth universally acknowledged, that a married man in possession of a good home is not in want of his wife’s DIY projects but must endure them anyway.
Such is the case in our good home, which having added a goodly number of children and one 75-lb dog to its four walls in three years needs the occasional refresh to keep the mother of said children from, in Austenian terms, becoming exceedingly vexed.


In spring 2020, as I succumbed to my stir crazy, I needed to paint the living room wall green. Who am I kidding? I needed to make over the entire living room, but quickly realized the negotiation process for such projects was more involved than I had anticipated.
My husband doesn’t mind my interior decorating, but he doesn’t like chaos, and he fundamentally disagrees with my use of the term “need.” Since even the smoothest DIY comes with some measure of mess, and he may have a point about the urgency of my “need” to move the couch to the other side of the room, I have scaled back my aspirations. Most of the time.
Once, I endeavored to repaint the downstairs guest bath. The whole room was covered in this horrendous tri-colored bamboo stripping, and to add insult to injury, the bamboo was horizontal on the walls and vertical on the cabinetry creating the effect of peeing in an M.C. Escher stairwell. My husband rarely set foot in this bathroom, so I figured a quick DIY wouldn’t cause a kerfuffle. It wasn’t quick enough, I realized.
So, now we have a system. I DIY while he’s on a work trip and try to have as much set right as possible when he gets home, at which point he is happy to add any lighting or plumbing fixtures that need to be changed. Everyone wins. He gets the order he needs. I get the hard deadline I need to finish. And we all get to relieve ourselves without vertigo in our formerly bizarre bamboo suburban bathroom.
Why bamboo, you might ask yourself. Or whence bamboo, if I’m sticking to my vaguely Regency-era theme. Bamboo because it is another truth universally acknowledged that the former owner in possession of your home, must be in want of good or even neutral taste and yet possess incomparable skill for securely installing and adhering whatever egregious design choices he/she has foist upon you. And so it is here, where my husband once had to dig up, stone by heavy stone, an inlaid mosaic salamander design that spanned the entirety of the back yard. Someone really liked salamanders.
This is why I try to always make my DIY so half-assedly installed as to be easily removed when one day the next owner decides they were terrible choices (and I’m willing to concede a black ceiling may be among those one day). Because I’m paying it forward, y’all. If I bequeath to you a giant salamander, that thing is gonna be shoddy.
Which brings me to my latest DIY. An intermediate, mostly cosmetic makeover of the upstairs guest bathroom. I had five days to work. I also have 4 kids and a job, so that makes it more like 1.5 days, sprinkled throughout five days at inopportune times.
You can read about it in detail below or listen to
’s Kelly Maher and I talk about it on a podcast project, here.
The vision:
Remove the inexplicably UPHOLSTERED FABRIC molding from the wall/ceiling
Make my white, square shower tile more modern by dyeing the grout black
Refinish the vanity cabinet
Remove the giant, framed mirror and replace with circular or oval mirror
Paint the walls (white, bold blue or green, or black?)
Paint the floor tile
Add knick-knacks as needed
Epoxy the granite countertop
The reality:
Epoxying the countertops got nixed quickly because of time constraints, so you’ll have to wait for my report on that particular experiment. But the rest, I pretty much got done.
Painting the walls and refinishing the vanity are pretty self explanatory. For the cabinet doors, I sanded down to a more natural color, painted the frame around the raised panels black, and gave the natural wood a tung-oil wipe down.


Shower Tile:
I did some research, and by research I mean I watched a lot of other ladies doing DIYs on Instagram Reels. I determined Mapei Grout Refresh was the best option for changing the color of my shower grout from white to black. First, I cleaned all the walls thoroughly with Goo Gone Grout Cleaner, and only needed a grout brush, a paint scraper (I tried both plastic and metal), small paint brush, and paper towels for the project.
Pros: Inexpensive—$21 for an 8 oz bottle— which was way, way more than enough to cover three walls of my shower grout. I’d say I only used a couple ounces of the bottle.
Cons: Leaves some gaps and takes major elbow grease and time. I listened to many a podcast while I did this work. I didn’t end up needing the grout brush. As far as I can tell, the parts I did with it didn’t look better, and it made far more mess than when I just applied with a small paint brush. The hardest part was cleaning up after myself. The product suggests scrapers or wet paper towels for cleaning what you’ve colored outside the lines. Paper towel worked better but slowly, and my nails took a week to recuperate. Occasionally, cleaning the excess meant also removing the grout dye I had just put in. Booo.


Verdict: I like the effect and I’d try this again, but probably only in a small space with a wider grout path, so it would be easier to stay inside the lines. It’s a bit of a Monet, but I’m filling in some of the gaps with this Sharpie paint marker. I kind of wonder if I should have just used the marker for the whole thing. This is a guest bath, so it doesn’t get a ton of use, but I’ll update on how it wears. When compared to removing and replacing tile, I’ll take this any day for a refresh.
Painted Floor Tile
Oh, yes, I painted my floor. I did a similar project 10 years ago and the technology has improved a bunch since then. Again, I researched on Instagram and ordered Rust-Oleum Floor Coating (in white) and Top Coat duo and another quart of black because I had plans for a stenciled pattern to make things more difficult. No plain old solid colors for me!
My stencil did not arrive in time, which triggered a panicked search for a makeshift stencil and even a momentary diversion into the possibility of potato stamps. I abandoned that idea, but may use it elsewhere in the future.
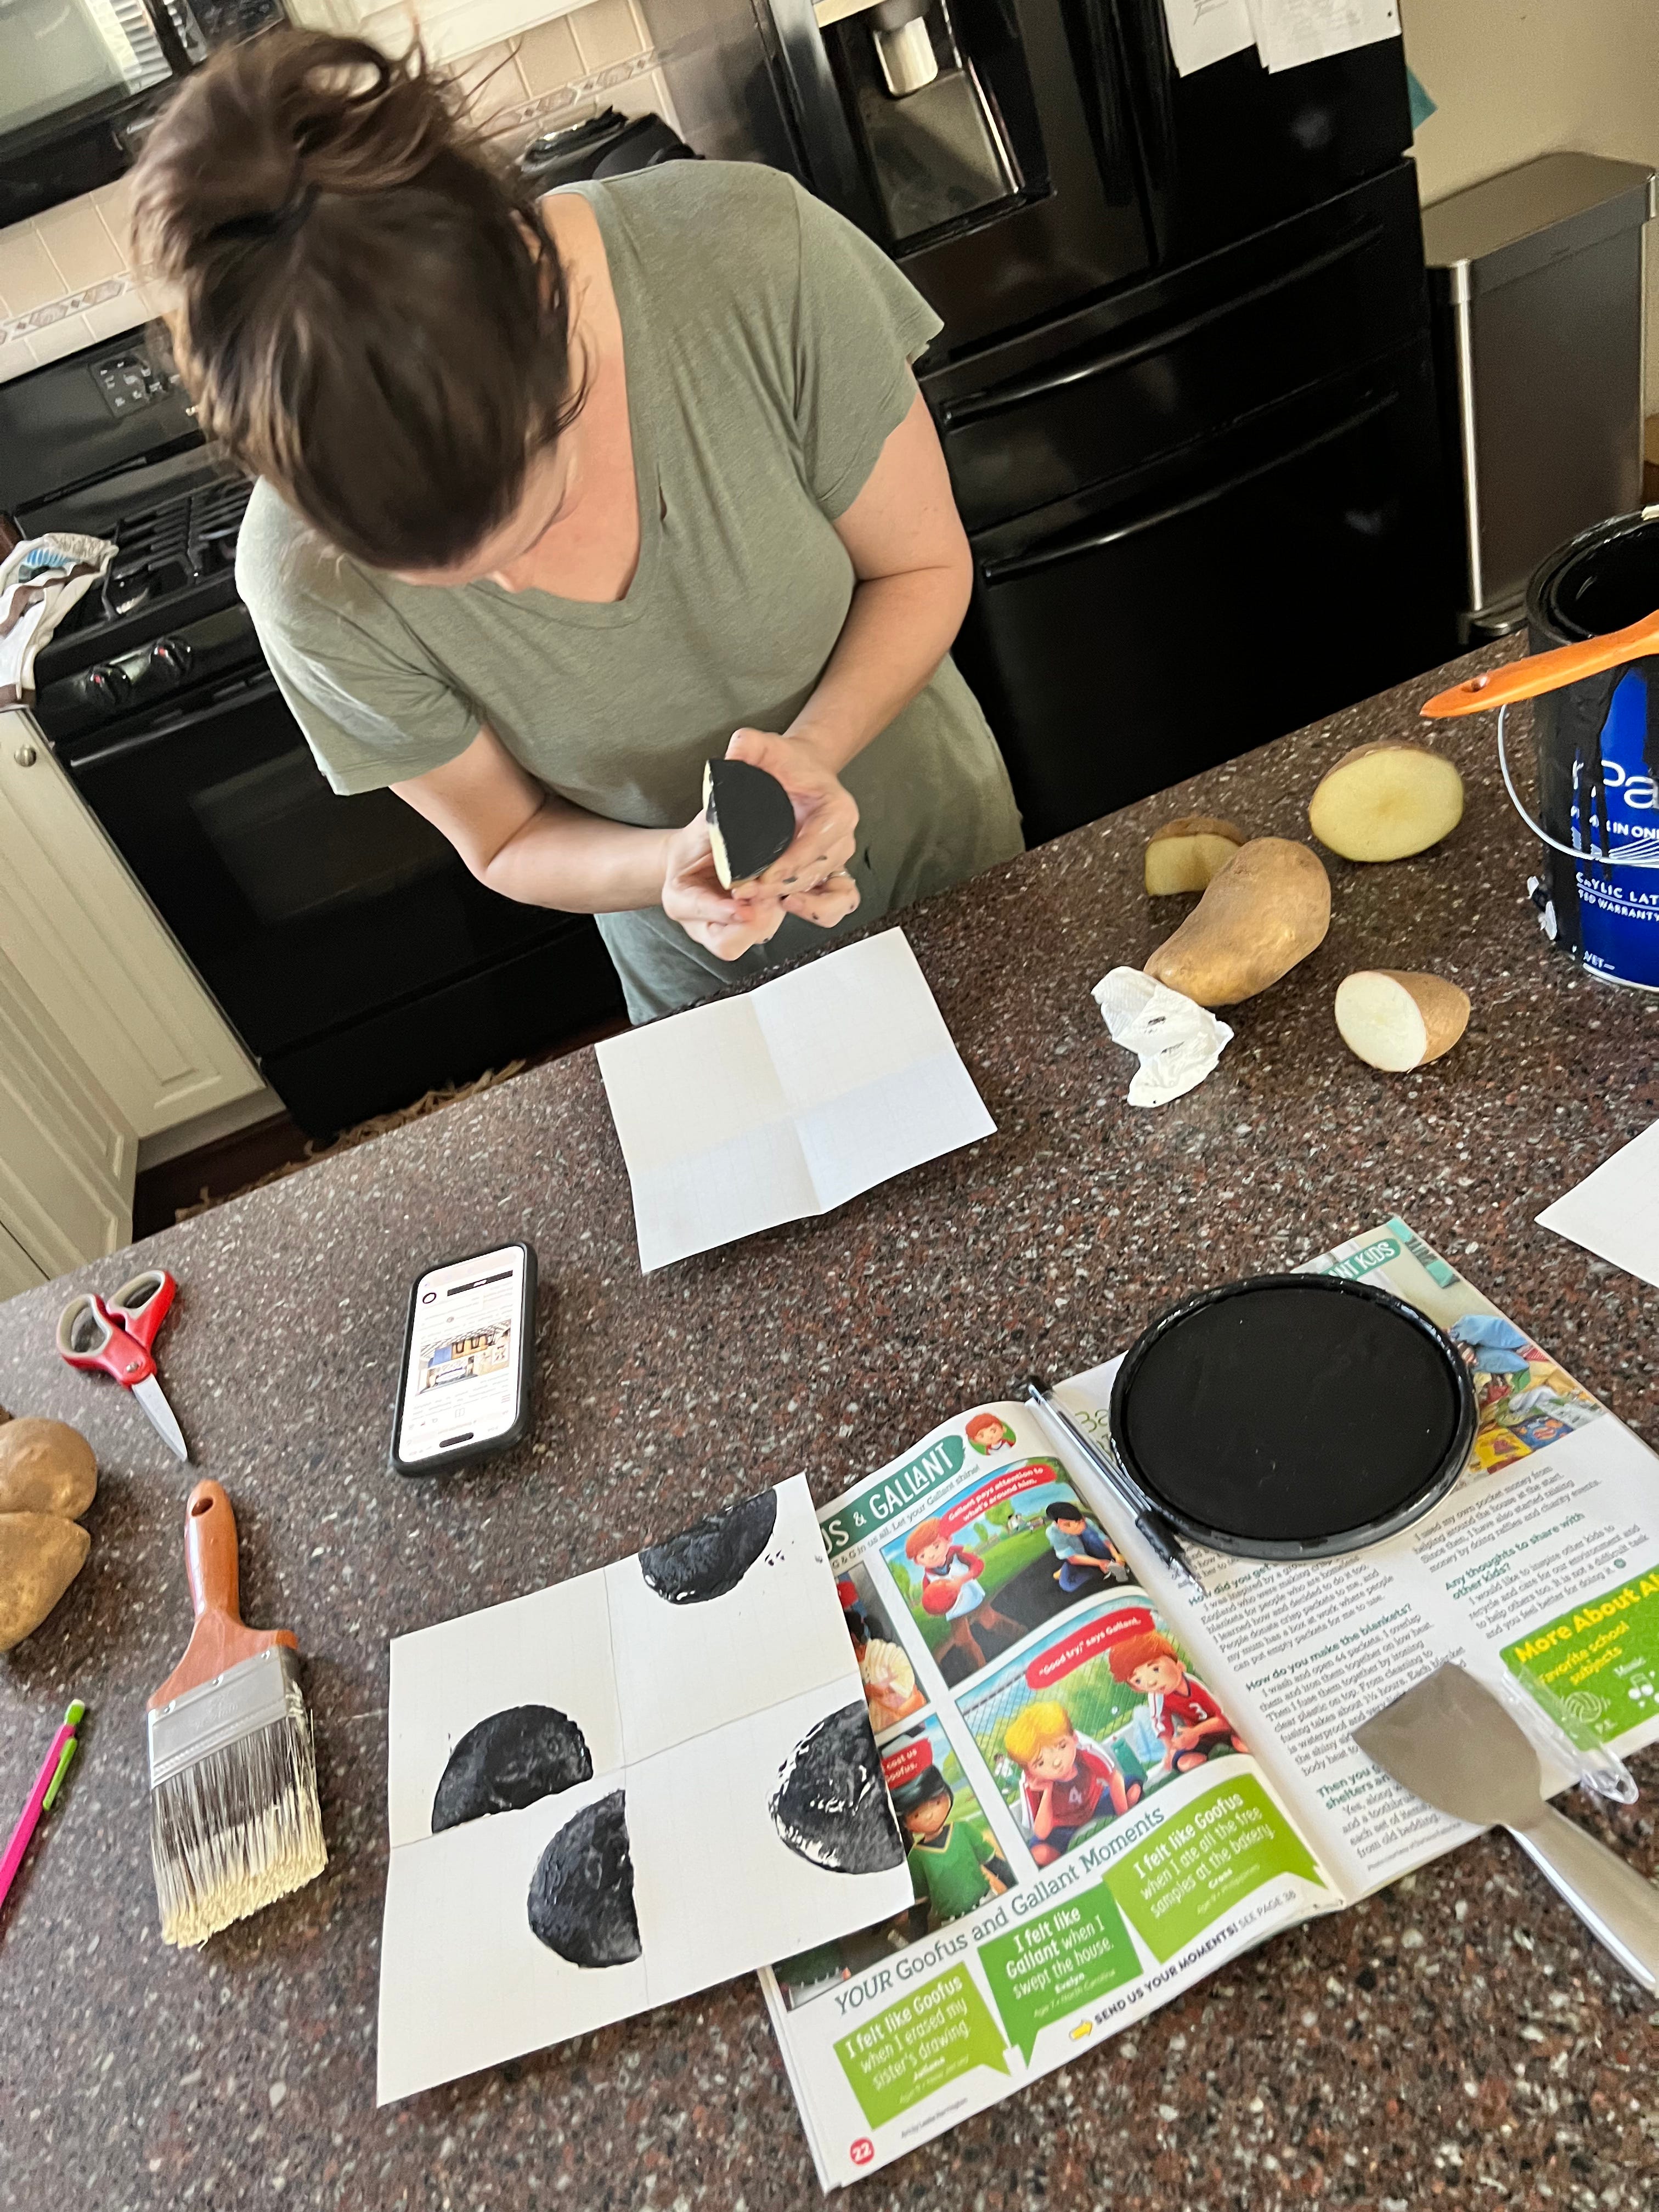
I cleaned the floor thoroughly and tried to get rid of all dust and hair, which is a trial with so many women and one giant dog in this house. There’s no sanding required for this product but we’ll see if I live to regret that. The first coat of white went down feeling quite primer-y, so it felt like it adhered well. I used a brush to edge around the vanity, toilet and bath, and then rolled with a long-handled brush while standing outside the bathroom.


Next up, I used some forms cut out of posterboard, which I traced with the Sharpie paint pen onto the floor. I then filled in the shapes carefully with Rust-Oleum Floor Coat in black using a craft sponge paintbrush. In the end, the pattern I created looked a bit like a Mandalorian helmet and I later found out I could have just gone full Mando because the Internet has everything. Alas, it will have to be next time.
Did I paint myself into the bathtub at one point while touching up these shapes? Yes, yes I did.
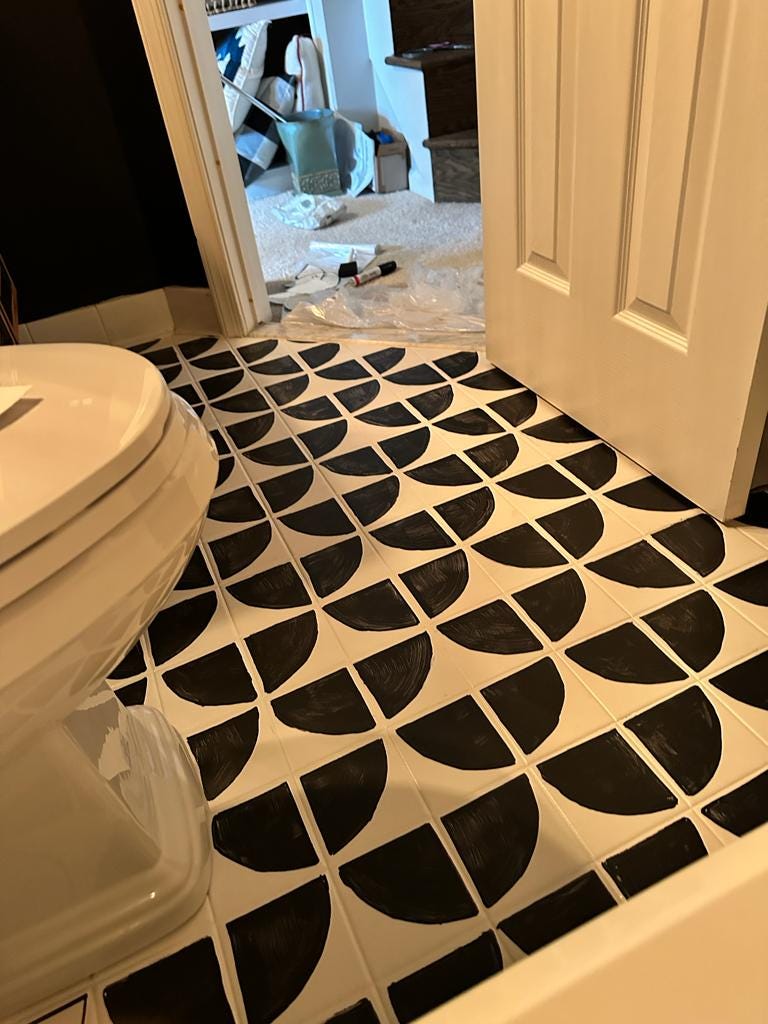
Pros: Reasonably priced and easy to apply. Love that there’s no sanding required, though I’m sure it wouldn’t hurt. So far, it feels very sturdy and safely adhered with one top coat on it. Lots of visual impact!
Cons: The kit does not cover a lot of square footage. Any bigger a bathroom and I would have needed two quarts of my white base coat. Very hard to get all dust and debris off of the primer-y base coat, as it’s meant to be a bit tacky. I got most of it, but I’m sure there are dog hairs cemented into my floor now. The stencil part of this was the hardest, but that’s on me. I went for a look of organic imperfection because I knew it wasn’t going to look like a machine printed these tiles.
Verdict: LOVE IT. Lots of bang for my buck in the impression it makes. It was surprisingly easy. It took me a handful of hours (maybe 4-5 minus drying times?) of actual work on the floor. Even tracing and coloring in these shapes wasn’t too arduous in a small space.
As with most DIYs, this was theoretically simple, but not easy. Totally worth it, though I did have moments when I was unsure, like when I mislaid my stencil pattern on ONE TILE and when I tried to remove that giant mirror without injury. Ta-dahhh!

I am very impressed and have zero understanding of how you pulled this off with the four kids and a dog in the background!
This is my marriage too. Even down to Jane Austen references (my wife teaches English Lit.) I sent her this article. She responded with 😬 emoji.